Your account transactions area is located in the center of the screen, and takes up most of the page. The most recent account activity is displayed, sorted by date with the most recent transactions at the top.
Each transaction shows the most relevant information for the type of account that’s selected. For example, a checking account might display date, description, deposit, withdrawal, and balance.
If Memo text is added for a check transaction, the memo will appear in the Description column.
-
Find a Transaction
The transaction list shows your most recent transactions in descending order by date for the date range displayed. The transaction description appears on the first line along with other relevant information (e.g., amount and balance). If the transaction is a check, you can click the check number link to see the front and back of the check image.

-
Filtering Transactions
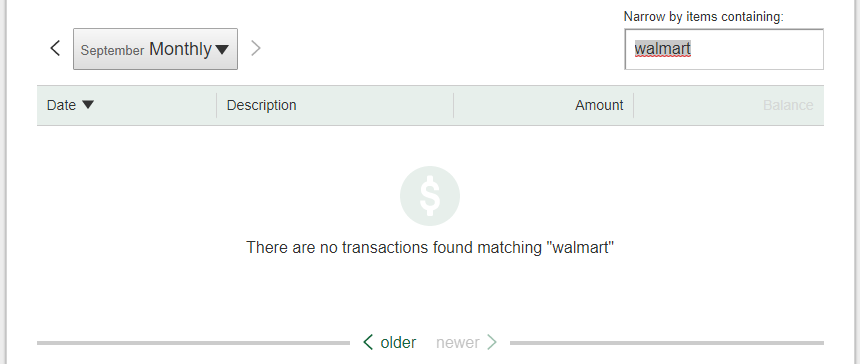
Just below the Transfer, Export, and Print links you’ll find a Narrow by items containing field that allows you to filter your search for a specific item or group of items by entering key words in the field. You can use numbers, letters, or a combination of the two (e.g., Target, 25.00, #1234, etc.).
The system will return all of the results that match the key word(s) for the selected date range in the transaction’s list located just below the filter field. For example, entering ‘Chev’ in the field returned results for Chevron.
The system combs through the Description, Deposit, and Withdrawal columns based on the selected date range and displays any matching values.
To use filtering:
- First make sure that you have the date range that you want to search (month, 30 days or custom date range).
- Enter the specific value that you are looking for in the Narrow by items containing field. (The page will refresh again to show only the matching items.)
- If the system could not find any match, you’ll have the option to view the previous time period by selecting <older at the bottom of the page. If you still weren’t able to locate the item you want, consider adjusting the date range further and try again.
- First make sure that you have the date range that you want to search (month, 30 days or custom date range).
-
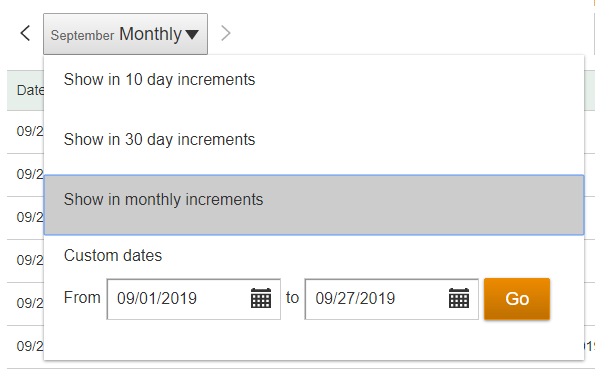
Change Default Transaction Date Range
You can change the date range by selecting your desired date range from the date range dropdown list. The options that can be used to set the date range are: 10 day, 30 day, or monthly increments.
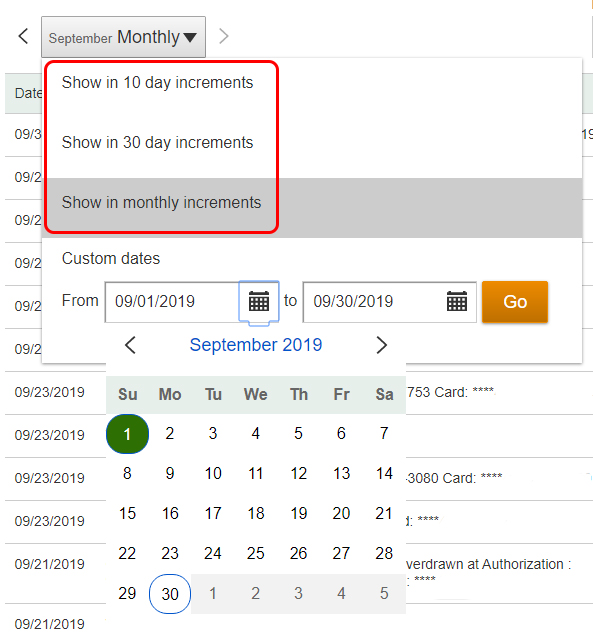
Custom date ranges are not allowed as a default.
You can use the left and right buttons to go forward or backwards in time to explore adjacent transactions. Select a different date range just click on the date range dropdown and select another time period.
Use a Custom Date Range
To enter a custom date range, click the From calendar icon and use the » « controls to navigate to the month you want and click on the date you want. Repeat those steps for the To calendar icon and click the Go button to display transactions for the new date range.

-
Change the Default Sort Order
By default your sort order is date descending (meaning that the most recent transactions are at the top). If you would like to change the default sort order, click the arrow to reverse the sort to date ascending (oldest transactions at the top) and your preference will automatically be saved.
Saving your default sort order only applies to the Date column.
If you want to change the sort order just click on another column header, except for the Balance column which cannot be sorted.
If the sort order of any column is changed (other than Date), the Balance column will not be displayed.

-
Exporting Transactions
You can now export your transactions from the Account History page. Transaction export is available for all accounts and will extract all transactions within the selected date range.
- Select Export
- Multiple export file type formats are available. Choose File Type
- Export

Copy & Paste:
You can also copy data from the transaction list and paste it into standard spreadsheets like Excel. Highlight and copy the data you want (e.g., date, description or amount) and paste it into a row of the spreadsheet or anywhere you want (Word doc, notepad, etc.).
Helpful Tip:
If no transactions are available for an account within the selected date range, the Export button will be grayed out (disabled) and cannot be selected.
-
Printing Transactions
In the upper-right portion of the transaction history list, you will also find a Print button that, when selected, opens a new window with the transactions presented in a printer-friendly format. The transactions that are printed match the same date range of the transactions that are displayed on the page. The standard browser Print window opens over the transaction list and gives you the option to select another printer (if needed). Clicking the Print button sends the transaction list to the printer.
